Lesson Title:
Illuminated
Manuscripts - Expressing Ideas about Self as a Member of a Family
Author: Lucy Andrus
Grade/Age Level: Elementary
Written here for: Third Grade Inclusion Class
Conceptual Basis For This Lesson:
Unit/Theme, Relation of Lesson to the Unit, Major Concepts to be Learned:
To express our ideas about being a member of a family using art materials, we will combine written text with visual imagery, borrowing from the practice of illuminating manuscripts to make text special and attractive: use of jewel-tone colors, the use of pattern and decorative motifs inspired by nature, and the use of symbols to stand for an idea.


Relation to
Life:
Learning
Standards
Goals Specific
to Lesson/Unit (reflecting NYS standards, & targeted learning areas. See
Abbreviation Key at end):
- Increase awareness of and appreciation for diverse people and cultures (AH, Std. 4, S, E)
- Enhance self-concept through identification with cultural heritage (S, E)
- Increase understanding of the cultural and historical significance of Medieval artistic expression (AH, AC, A/C, Std. 3 & 4)
- Develop deeper understanding of self as a contributing member of a larger social group (S, E, LV)
- Increase awareness and understanding of ways in which cultures represent and record lineage and history using visual means: artistic and literary (A/C, AH, Std. 4)
- Develop greater appreciation for reading, writing and personal narrative (A/C, C, S, E)
- Enhance understanding of the universality of the use of art elements and principles in visual expression (AH, AC, AP, Std. 3 & 4, E, S)
- Develop skill and knowledge in illuminating text through use of art/design elements and principles (AC, AP, Std. 1, 2, & 3)
- Improve skills of care and attention to task and craftsmanship through a multi-step process combining visual and written expression (AP, Std. 1, W/S)
Performance Objectives for Observational Assessment (reflecting Goals):
The students will be able to:
Opening:
- Recall/name the continent of Europe and at least two of its countries Goals 1, 2
- Define the terms, Medieval, and/or Middle Ages Goal 1
- Recall/name and describe at least two aspects of Medieval life and culture learned from previous lesson Goals 1, 2
- Describe one way in which Medieval people represented family and ancestry (for example use of heraldry, coat-of-arms, crests) Goals 1, 3
- Name/define the term, illuminated manuscript Goals 3, 8
- Describe at least one reason
why Medieval books were precious
Goals 3, 6 - Name one purpose/reason why manuscripts were illuminated Goals 5, 6
- Describe at last two visual characteristics of the artistry in Medieval illuminated manuscripts (for example: jewel-tone colors, decorative pattern inspired by nature, flourishes to individual letters through size, shape, color, use of symbols) Goals 5, 7, 8
Middle:
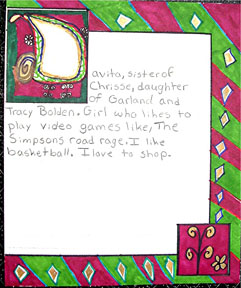
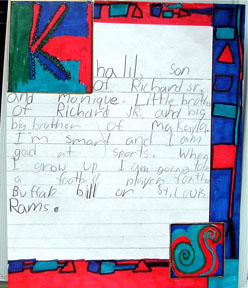
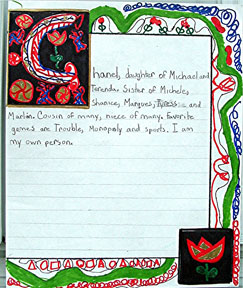
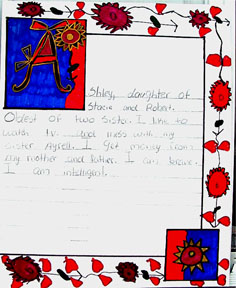
- Describe self in relation to family, naming at least one way in which they contribute to their family life Goal 4
- On practice paper, write out a minimum of two sentences that describe their relation and contribution to their family life. Goals 4, 6
- Transfer the edited sentences to good paper using pencil or marker (note: we’re using soft, thick lead pencil to address concern for possible writing mistakes that need to be fixed.) Goal 9
- Illuminate their page of text
by:
- using Sharpie marker to print the first initial of name within the larger square on the piece of cardstock provided (this has 2 pre-drawn squares or rectangles, one larger than the other)
- using Sharpie markers (our choice) or colored pencils to embellish this letter using color, pattern, and/or symbol as desired
- using markers to draw a symbol to represent any idea of self and family within the smaller square on the cardstock provided
- draw decorative border within the pre-drawn margins on the paper
- demonstrate use of repetition and pattern in the boarder decoration
- cut out finished squares
containing illuminated initial and symbol, and use glue stick to adhere
to appropriate/indicated places on the written text
Goals 4, 5, 7, 8, 9
Closing:
- Recall/correctly describe the term, illuminated manuscript Goals 3, 8
- Recall/describe one purpose of illumination of text Goals 3, 8
- Read illuminated page to class and describe use of art elements, principles and symbols to convey ideas about family Goals 4, 5, 6, 7, 8
- Demonstrate good listening skills
while others share Goal 4
Tools Needed For Application
Vocabulary (defined
in age appropriate, student-friendly language):
-
- Heraldry: The
practice of designing the symbols that represent a person’s ancestry,
and also the insignia (sign) or badge that a knight would wear into battle
to show who he is, what family he is from, and who he is fighting for
- Illuminated:
to brighten, to lighten, to make something stand out through the use of
art elements and principles such as color, size, placement and pattern
- Manuscript:
something written by hand, like a book (as opposed to printed)
- Medieval:
Referring to the Middle Ages, a period of time in history app. 500 to 1500
AD
Visuals:
- Teacher-made: example of finished product; map of Europe; chart showing examples of two kinds of decorative flourishes used in Medieval illumination (geometric, and motifs inspired by nature)
- Art Resources: exemplars of Medieval illuminated manuscripts; chart of heraldry designs and symbols; visual of coat-of-arms or family crests (as available); actual coat-of-arms (if available)
Materials and Preparation:
NOTE: We used the following preparation techniques to address our issues of time, and also to minimize problems from mistakes that could occur when children are printing/writing the text on their page.
Prepare a text paper for each child by cutting enough 9x11 sheets white paper for each student and pre-drawing borders and squares for illuminating and decorating. We drew a 1-¼ inch margin lines across top, bottom and down right sides of paper where students will draw decorative borders. We also drew a 3x3 ½ inch rectangle (can do a square if desired) in top left corner area (where illuminated first letter of name will be placed), and a 2x2 inch square in bottom right corner area (where family symbol will be placed). We also drew a light line inside the 3x3 ½ rectangle where students will base/draw their initial illuminated letter. This line will then correspond with the first writing line so child’s full name appears correctly aligned.
To help keep the written sentences straight and even, we drew ½ inch lines in pencil within the text area so students can easily write their sentences on the lines and then lines can be erased afterward. Again, we aligned the first writing line with the letter line inside the rectangle.
Prepare a piece of cardstock (we used large, unlined index cards) for each child to draw his/her illuminated letter and family symbol on. On the cardstock, use black permanent marker to draw the outline of the 3x3 ½ rectangle (for illuminated letter) and the 2x2 inch square (for family symbol) mentioned above. When completed, these shapes will be cut out and glued onto the pre-drawn areas of the text page as described above.
- Bodhran drum
- CD player and Medieval music
- Pencils and erasers (we use soft thick lead pencils)
- Scrap paper for writing out text idea
- Sharpie markers in assorted colors (or can limit to Medieval palette of red, blue, green, black)
- Gold metallic markers for special embellishment (optional, because these are expensive to buy for each child)
NOTE: We chose markers to draw with because colored pencils are too light, and our students will not exert the kind of pressure with these that will result in intense colors. Older students may be able to do this more effectively.
Application
Adaptations:
For children who struggle with writing, more time may be needed for composing and printing out the text/story. We used the method described above under Preparation so that the visual and written parts of this assignment could be worked on separately if necessary. That is, if students needed more time with composing and writing their final text, they can do this during the week with their classroom teacher, and in the Art Partners session, we will focus on the drawing aspect after the students have written out their main ideas on scrap paper.
Procedural Steps (details on procedures from beginning to end with ability-appropriate language scripted in as needed):
Opening:
1. Teacher opens session with playing of the Bodhran drum to bring children together. All sing Hello Song to beat of drum.
2. Teacher has children recall the continent of Europe referring to map, and the culture we are learning about: Medieval or Middle Ages. When did this time period occur? What was life like back then, hundreds of years ago? Teacher asks children to name/describe some ideas about Medieval culture that they recall from the slide presentation last session.
3. Using any images available, teacher has children recall some of the Medieval art forms we learned about: stained glass, architecture of the amazing cathedrals, heraldry design (creating badges whose color, shapes, lines and symbols tell who the person is and which family they come from), family coats-of-arms and crests.
4. Teachers takes a minute to focus on coat-of-arms, showing an example and explaining how this family symbol can show ideas about a family…who they are, where they come from, something about their history and past that makes them stand out, something about their ancestors, etc. It’s almost like telling a story about the family without using any words!
5. Teacher then segues to the idea of Medieval illuminated manuscripts that also tell stories. Teacher and children discuss the place of books and reading during the Middle Ages:
- Most people could not read, only some of the nobles, and the clergy who were educated. It was a very special thing if you could read in the Middle Ages. The serfs and common folk certainly could not read.
- The printing press was not invented yet, so where did books come from? Books had to be made by hand. Teacher defines manuscript, to write by hand.
- It took many months and sometimes years to write books, they were very, very precious. There were not many of them like we have today. Today, we have printing presses and computers that can print thousands of books a day.
- Who wrote these books? Mainly the monks and nuns who worked for the Church.
- Because paper was not yet used in Europe at this time, the pages of the books were made from animal skins, like sheepskin. The skins would be scraped and cleaned (like the skin for a djambe or bodhran drum), then dried in order to be used as pages in a book. These pages were called parchment. It took a lot of time to make enough parchment for just a single book.
6. Teacher then leads into discussion of why and how the scribes (people who wrote the books) made these books very special using art ideas, and illuminating some of the letters and words:
Teacher shows exemplars of illuminated manuscripts to explain:
• Illuminate means to make bright so your eye would be attracted to the page. The scribes did this using art materials and art elements. Because it took so long and was very expensive, the scribes only illuminated some of the pages and letters in a book.
• Why do you think scribes illuminated the pages of the books they wrote?
Books were so special, that adding artwork to illuminate them made them even more special. Most books were stories about the Christian religion, and to show their love of this religion (and to glorify God), the scribes made the pages of these stories even more beautiful by adding artwork (just like the builders and architects who made the churches so beautiful).
Teacher passes out one example of illuminated manuscript page to each small group to examine while discussing:
• So how did the artist scribes illuminate the pages and letters? What elements of art do you see? What principles do you see (like repetition, overlapping, pattern)? What kinds of designs do you see?
(use of symbols? things that look real? Things that look abstract?)Following small group discussion, teacher then gathers everyone’s attention as one large group to discuss:
• To make the pages beautiful, the scribes would use colors that were so bright, they looked like jewels: reds, blues, greens, white and yellows.
• Colored paints were made from things found on the earth: yellows, browns, and reds were made from rusting metals; greens came from plants; blues came from rocks and plants; whites came from the ashes of burned bird bones. These material were crushed into a fine powder (like when we made pigments). Who remembers what would be added to make the crushed and powdered pigments into liquid paint? Water and egg whites.
• The artist scribes even added real gold to make the pages even brighter. They would pound a sheet of gold so thin, and then glue it down to the paper with honey or sugar (no Elmer’s glue in those days!). Sometimes the artist illuminating the page or letter would use an animal tooth to etch/scratch a design into the gold.
• The artist scribes used different ideas to decorate the letters and pages. Sometimes they would use designs from plants and nature, or geometric shape designs. They would make the letters larger and shaped in interesting ways.
• Because it took such a long time to do all this work by hand, the artist scribes did not illuminate every page or every word, usually only the first letter of the word at the top of the page.
7. Teacher presents idea of combining two of the things we learned about Medieval art and culture. One, the idea of using art elements and symbols to tell something about your family. And two, the idea of writing something and illuminating a letter and a page. Each of you can make an illuminated page that tells something about yourself and your place in your family.
8. Teacher shows and explains the teacher exemplar, reading the page, and pointing out how the first initial of her first name is illuminated, and the borders are decorated, and the bottom corner has a symbol that shows something about her family.
9.Teacher asks the students to think about their place in their family: how they contribute and help their family, what they love about their family, what their place is in the family, suggesting we begin by writing down a couple of sentences that tell about these ideas. Children are dismissed to their small groups to begin work.
Middle:
10. S/T’s work with children
to write their sentences about themselves within their family on scrap paper
using pencils. Label with students’ names.
Since we are pressed for time, we will leave the practice writing and turn
to the illumination, having the children re-write their sentences on the good
paper during the week if we don’t have time to finish today.
11. S/T’s have children begin their illumination. Distribute the cardstock/index cards with the two pre-drawn squares (or rectangles). Have students begin by printing their initial inside the larger shape using the markers, asking them to first think of how to stylize it (make it larger, use interesting line, draw it as a plant, etc.). Continue by having students add color to the background and any other decorative touches (don’t overdo this part).
12. S/T’s then have children design and draw a symbol for their family inside the smaller shape, and illuminate it with color, background, etc. What symbol could you to use show something about your family? Does your family like… (to play games, go out in nature, swim, talk, watch movies, etc.)? Is your family….(adventurous, quiet, funny, loving, etc.)?
13. S/T’s then have the students work on illuminating the page by drawing designs within the pre-drawn border spaces on their good paper. These designs can incorporate symbols, patterns, nature motifs, etc. Encourage the use of art principles like repetition to create a pattern, overlapping of color and shape, etc.
14. Optional: Once basic designs are drawn, students may share metallic markers to add small touches of gold as S/T’s see fit. No one students should use marker for longer than a minute or two, so S/T’s should encourage students to look at their designs and determine where a touch of gold might look good while they’re waiting their turn. For example, outlining their letter, or adding dots around a flower motif.
15. When letters, corner symbols, and border drawings are completed, students can begin to transfer their written statement onto the good paper, lining up the subsequent letters of their name with the marked initial letter line (pre-drawn on the paper; see preparation above). NOTE: if time runs out, the final writing can be done another day, and/or by arrangement with the students’ classroom teacher.
16. Finally, students will carefully cut out their illuminated letter and family symbol from the cardstock, place it in corresponding pre-drawn space on the text paper (being sure to align initial letter with rest of name), and adhere using glue stick.
Closing:
17. Teacher has children recall major concepts and definitions, noting how artmakers across time and cultures all use the same art elements and principles to create their images. Teacher should also ask students to identify an artmaker behavior that they employed during the session (see About the Program link: The Three A’s and Three C’s).
18. Students completed manuscripts should be displayed and discussed. If times, mount on black construction paper prior to discussion. The use of symbols should be noted, and connections made between visual and written imagery. The idea of self as a contributing member of a family should be emphasized, and then related to being a member of other groups, like classroom and school, and larger community. Just like Medieval people, we all work together in various groups to make things happen and to keep life going.
19. Teacher will close with a preview of our final session in this series on Medieval culture: A Medieval Marketplace and May Day Celebration!
Assessment:
In addition to observation of the Performance Objectives described above for evaluating students, as well as noting what teachers may need to re-teach or do differently, questions to ask might include:
- How did the students participate in the opening discussion? How well were they able to display proper group discussion skills? (We work on attention span, good listening, raising hands, speaking when appropriate)
- Were students able to identify, describe and write about a significant role they play in their family structure?
- Were students able to create a meaningful symbol to represent a family characteristic?
- Did the students’ manuscripts
demonstrate good craftsmanship and care with media?
Abbreviation Key
DBAE: |
NYS Standards for the Arts: |
|---|---|
| AH = Art History | Std. 1 = creating, participating in art |
| AC = Art Criticism | Std. 2 = knowing art materials and processes |
| AE = Aesthetics | Std. 3 = responding to works of art/artists |
| AP = Art Production | Std. 4 = knowing cultural dimensions of art |
| Needs Assessment Areas for Developing Skills and Abilities: |
||
|---|---|---|
| A/C = academic/cognitive | M/P = motor/perceptual | E = emotional |
| C = communicative status | W/S = work/study habits | S = social |
| Pre-V = prevocational skills | L = living skills |
|
This is a non-commercial website and is to be used for educational or research purposes only. No commercial use is permitted without the consent of Art Partners. "Fair use" is claimed under U.S. copyright law, sections 107 and 108. For questions contact:Art Partners
©2002 Art Partners Program | All Rights Reserved